- buckets or bowls
- measuring utensils (paper cups or scoops, depending on the size of bricks desired)
- molds (milk cartons cut lengthwise for rectangular blocks; small milk cartons with tops cut off for square bricks; old ice-cube trays for very small bricks)
- mud
- newspapers to cover tables
- paper towels
- plastic wrap (optional)
- stir sticks (large craft sticks or wooden spoons)
- straw
- water
- adobe
- brick
- build
- dry
- materials
- mold
- shape
MA Standards:
English Language Arts/Literature/RL.PK.MA.9 With prompting and support, make connections between a story or poem and one’s own experiences.
English Language Arts/Language/L.PK.MA.6 Use words and phrases acquired through conversations, listening to books read aloud, activities, and play.
English Language Arts/Speaking and Listening/SL.PK.MA.1 Participate in collaborative conversations with diverse partners during daily routines and play.
Head Start Outcomes:
Approaches to Learning/Initiative and Curiosity Demonstrates flexibility, imagination, and inventiveness in approaching tasks and activities.
PreK Learning Guidelines:
English Language Arts/Reading and Literature Relate themes and information in books to personal experiences.
Make Adobe Bricks
© Commonwealth of Massachusetts, Department of Early Education and Care. All rights reserved.
Skill Focus: Fine Motor Skills, Vocabulary, Follow Directions
Educator Prep: This exploration can be messy, so allow time for cleanup. Be sure children are wearing old clothes or are covered by old shirts.
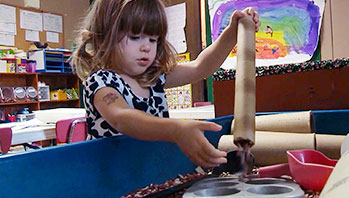
Have children explore making their own building materials. Introduce the activity by telling children that they will be making their own building materials to use to build. Tell them that they will be making adobe bricks like the man in the book The Three Little Javelinas. Show pages from the book to refresh children’s memories. Say, We are going to make bricks like the man, using a mold. (hold up the mold) The mold helps give bricks their shape.
Model how to make an adobe brick. Explain every step clearly as you model. If you use an ice-cube tray, line it with plastic wrap to make it easy to unmold (lift out) bricks. Say,
- I put a scoop of mud in the bowl.
- I add a scoop of water.
- I add bits of straw to make it strong.
- Now I stir with a stick.
- I mix and squeeze until it feels like soft clay.
- If it doesn’t feel like clay, I add more mud or straw.
- Next I scoop and pat the mixture into the mold.
- Finally, we will let our adobe bricks dry.
Explain that the bricks need to be dry before children can use them to build. Guide children as they work. Help them decide whether they need to add more water, mud, or straw.
The bricks should take about a day or so to dry completely. When the bricks are dry, cut or remove them from the molds. Then, let children decide how they might use the bricks to build a tower or other structure. Ask, How are the adobe bricks different from the other materials you’ve used this week to build towers? How can you use the bricks to build a tower? How would you arrange them? Send children home with their bricks at the end of the week to continue exploring at home.
Adaptation: You might prefer to have each younger child do the activity individually, with one-to-one supervision.
English Language Learners: Point to the activity supplies and name them. Pantomime how to use the materials. Have children repeat the names and pantomime uses after you.