- camera or cell phone with camera
- clear plastic cups
- clear soda bottles (cut in half with holes poked in bottom for drainage)
- dried kidney or lima beans (some soaked overnight)
- paper towels
- plastic spoons
- plastic wrap
- potting soil
- tape
- water spray bottles
- bean
- grow
- plant
- seed
- soil
- sprout
MA Standards:
Language/L.PK.MA.6: Use words and phrases acquired through conversations, listening to books read aloud, activities, and play.
Head Start Outcomes:
Logic and Reasoning/Reasoning and Problem Solving: Classifies, compares, and contrasts objects, events, and experiences.
Science Knowledge/Scientific Skills and Method: Observes and discusses common properties, differences, and comparisons among objects.
Science Knowledge/Scientific Skills and Method: Participates in simple investigations to form hypotheses, gather observations, draw conclusions, and form generalizations.
PreK Learning Guidelines:
English Language Arts/Language 2: Participate actively in discussions, listen to the ideas of others, and ask and answer relevant questions.
Science and Technology/Inquiry Skills 4: Record observations and share ideas through simple forms of representation such as drawings.
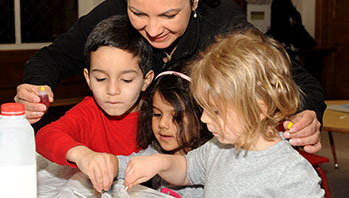
Small Group: Plant Seeds
© Commonwealth of Massachusetts, Department of Early Education and Care (Jennifer Waddell photographer). All rights reserved.
STEM Key Concepts: There are many different types of plants and seeds; Some plants start from seeds; Plants have different parts: roots, stems, leaves, and fruit; Plants grow in many places; Plants grow in places where they get their needs met; Plants often grow in some type of dirt
ELA Focus Skills: Compare and Contrast, Follow Directions, Listening and Speaking, Vocabulary
Educator Prep: Soak some lima beans overnight (for children to open up). Precut the soda bottles in half (one for each child). Be prepared to have enough supplies so you can plant extra cups of seeds to use to demonstrate what happens if you do not give a plant the water and sunlight that it needs to grow; use to substitute if a child’s seed does not grow.
Safety Tips:
- Remind children to wash their hands before and after the activity.
- Remind children not to eat ANY plants or touch any plants without asking an adult.
- Children’s allergies need to be taken into account before going outside.
Now that children have had an introduction to seeds, tell them they’re ready to plant some seeds of their own and observe what happens.
- Place a few hard bean seeds on the table. Remove the soaked beans from the jar and carefully spread them out on paper towels or paper plates. Have children touch both beans to compare and ask, How are the beans the same? How are they different?
- Allow children to open the soft seeds to explore what is inside.
- Then give each child a plastic cup. Using a plastic spoon, demonstrate how to scoop potting soil into the cup. Have each child fill the cup most of the way up with potting soil. Demonstrate for children using a plastic spoon to scoop potting soil into a cup. Have the child plant 2–3 beans in the cup.
- Model how to gently cover the seeds with soil. Show children how to moisten the soil using the water spray bottles. Ask, How much water do you think I should put on the beans?
- Help children write their names on tape and label their cups.
- Put plastic wrap over the cups and place them in a warm place. Tell children that the plastic wrap will help the soil stay moist. Place the cups in a warm place. (Remove the plastic when seedlings appear.)
- Ask children, How will we know if the seed starts growing? What do you think we will see when it starts growing?
Explain that children won’t be able to see the seed begin to grow under the soil, so they will also plant beans in the clear plastic bottle halves so they can watch what happens when a seed first starts to grow.
- Have children spray water on their paper towels and then stuff them into the clear bottle.
- Tell children to push 3–4 beans down in between the wet towels and the inside of the bottle.
- Help children label their bottle and place them all in one place.
Have children check the beans in their cups and plastic bottle halves daily and record their observations in their science notebooks or on the “Plants All Around” chart. Guide them to note how many days it takes for the first sprout to appear. Have them draw pictures of the sprouts. You may want to document their observations by taking pictures as they explore.
Adaptation: If very young children have trouble planting the seeds and watering them, work one-on-one, holding their hands to help them place the seeds and spray the water.